前提
新配了个电脑
配置 如下
- Intel Corei7 12700F 盒装
- 华硕 TUF B660M-PLUS WIFI 重炮手 DDR4
- 利民 PA120SE argb
- 影驰3060ti 金属大师OC[FG]
- 技嘉P750GM电源
- 金士顿 FURY 16Gx2 3200
- 金士顿 KC3000 1T PCIE4.0
- 金河田机箱 黑色
零件买回来组装了一下,先是装了win10,更新了显卡驱动,用娱乐大师跑分了一下,

然后就直接装上了kali
esc cap键位互换
因为个人比较喜欢用vim
第一件事指定是先进行键位互换
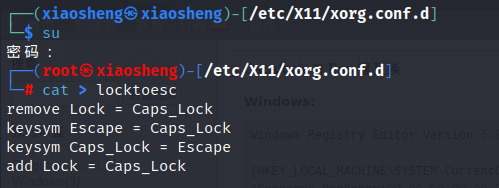
进入目录
/home/xiaosheng
$ cat > locktoesc
remove Lock = Caps_Lock
keysym Escape = Caps_Lock
keysym Caps_Lock = Escape
add Lock = Caps_Lock
^D
$ xmodmap ./locktoesc
目前少说也翻了有一百多篇文章,,全都千篇一律的告诉用/.zshrc || .bashrc || bash_profile
“~” 指当前账号的根目录
“.” 表示bashrc是隐藏文件,可以用 ls -a 或 ls -la命令看到
这里采用开机自启动项的方式,
进入目录
cd ~/.config/autostart
sudo vim clipboard.desktop

用vim编辑,添加
[Desktop Entry]
Type=Application
Name=Clipboard
GenericName=start keyboard
Comment=start keyboard
TryExec=xmodmap /home/xiaosheng/locktoesc
Exec=xmodmap /home/xiaosheng/locktoesc
Terminal=false
Hidden=false
*不推荐: *这里可以在~/.zshrc中添加,但是不推荐,网上有很多都叫这么做,但是,等你用就知道了,当你每次开启一个新的终端的时候,终端都会弹出一句讨厌的话,

xmodmap:  please release the following keys within 2 seconds:
    Control_L (keysym 0xffe3, keycode 37)
    Alt_L (keysym 0xffe9, keycode 64)
不推荐
xmodmap /etc/X11/xorg.conf.d/locktoesc
提前剧透一下,idea,vscode vim键映射
vscode
{
    "editor.fontSize": 18,
    "editor.codeActionsOnSave": {
    },
        // 取消Vim的键位映射,使用VSCode原生的键位功能
    "vim.handleKeys": {
        "<C-c>": false,
        "<C-v>": false,
        "<C-x>": false,
   },
   "vim.easymotion": true,
   "vim.incsearch": true,
   "vim.useSystemClipboard": true,
   "vim.useCtrlKeys": true,
   "vim.hlsearch": true,
   "vim.insertModeKeyBindings": [
    {
      "before": ["j", "k"],
      "after": ["<Esc>"]
    },
     { "before": ["<C-h>"], "after": ["<left>"] },
     { "before": ["<C-k>"], "after": ["<up>"] },
     { "before": ["<C-j>"], "after": ["<down>"] },
     { "before": ["<C-l>"], "after": ["<right>"] }
   ],
}
idea键位映射
// 这个貌似只能在windows下用,`linux`用我上面的`xmodmap`映射之后,就会冲突,导致不起作用, 如果有大佬在linux下能使`xmodmap`下`esc cap`映射的同时使`idea`中`esc`和`jk`键映射同时生效,麻烦在下面留言一下,感谢感谢
imap jk <Esc>
imap kj <Esc>
set timeoutlen=300
开发环境配置
准备阶段
0.0 设置root密码
# 注意哈  passwd!!!!!!   不是password
sudo passwd
0.1.先进行换源
这里是源地址,阿里云镜像
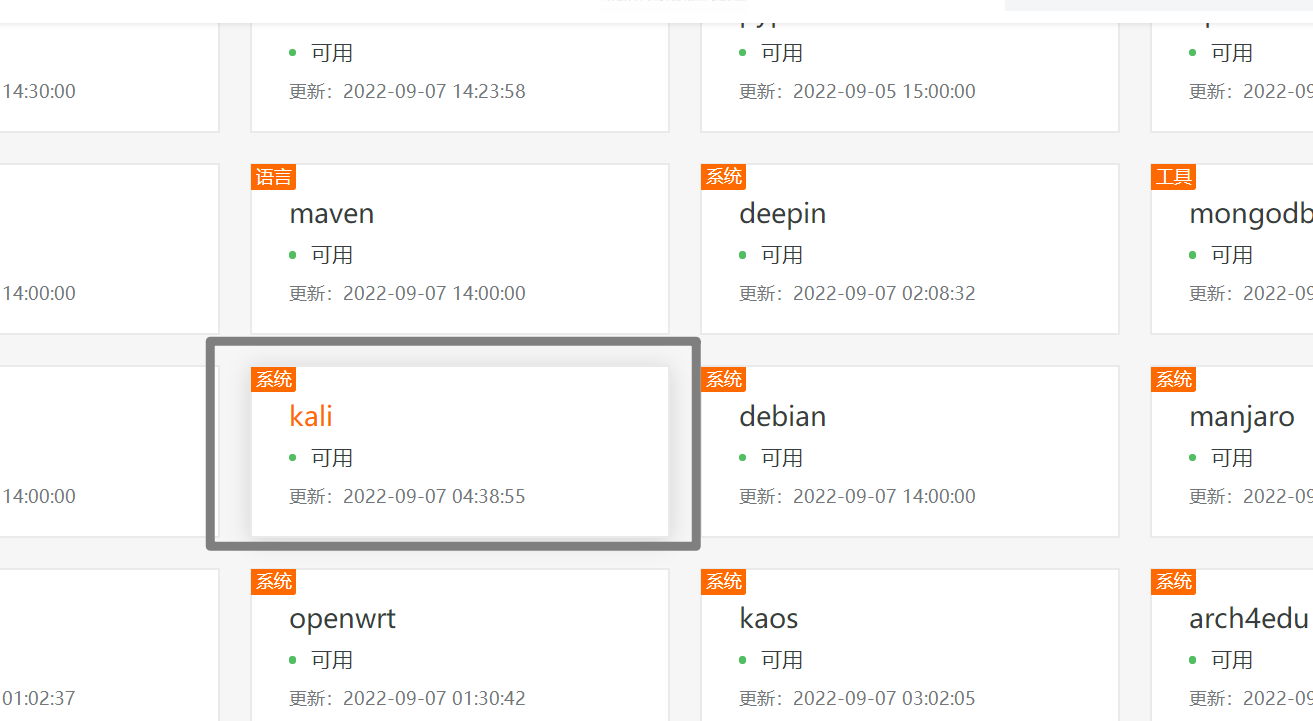
编辑/etc/apt/sources.list
sudo vim /etc/apt/sources.list
用vim编辑,注释掉本来的源,
deb https://mirrors.aliyun.com/kali kali-rolling main non-free contrib
deb-src https://mirrors.aliyun.com/kali kali-rolling main non-free contrib
我这里用 了好几个源,可以多粘贴几个
deb http://http.kali.org/kali kali-rolling main contrib non-free

deb https://mirrors.tuna.tsinghua.edu.cn/kali kali-rolling main contrib non-free
deb-src https://mirrors.tuna.tsinghua.edu.cn/kali kali-rolling main contrib non-free

deb https://mirrors.aliyun.com/kali kali-rolling main non-free contrib
deb-src https://mirrors.aliyun.com/kali kali-rolling main non-free contrib

deb http://mirrors.ustc.edu.cn/kali kali-rolling main contrib non-free
deb-src http://mirrors.ustc.edu.cn/kali kali-rolling main contrib non-free
其实可以不用注释掉kali本来的源,在kali·2020以后,他会根据安装系统地域自动选择比较快的源。
进行更新
sudo apt update
0.2.安装中文输入法
我这里选择的是搜狗输入法
下载链接点击这里
安装教程点击这里
# 更新源
sudo apt update
sudo apt-get upgrade

# 安装fcitx输入法框架, kali自带
 sudo apt install fcitx

# 设置输入法框架
im-config

# 卸载系统ibus输入法框架
sudo apt purge ibus

# 通过命令行安装aptitude
sudo apt-get install aptitude

# aptitude 安装fcitx、qt
sudo aptitude install fcitx-bin fcitx-table fcitx-config-gtk fcitx-config-gtk2 fcitx-frontend-all
sudo aptitude install qt5-default qtcreator qml-module-qtquick-controls2
# 安装搜狗拼音
sudo dpkg -i sogoupinyin.deb

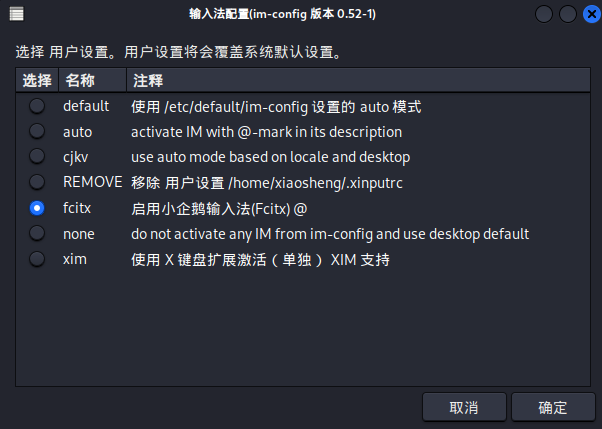
安装完搜狗输入法之后,
reboot
我是使用的
kali2022.3最新版,2022.2也使用过
开机之后就会惊奇的发现搜狗输入法没反应,点击右上角的键盘图标才会有反应,但要输入的时候又没有反应了,而且无法切换输入法,也无法激活输入法, (而且输入法默认配置的是搜狗啊,但就是用不了)卸载重装也不好使
0.2.2搜狗输入法解决办法
这是一个比较奇怪的问题,暂时没法解释
# 安装百度输入法
sudo dpkg –i fcitx-baidupinyin.deb
然后
reboot
在输入,就会发现全是乱码,按网上解决办法,没有用
鱼目混珠的解决办法,——》无用
然后卸载
# 卸载百度输入法
sudo dpkg --purge remove fcitx-baidupinyin:amd64

# 安装搜狗拼音输入法
sudo dpkg -i sogoupinyin.deb

# 重启
reboot
就好了
至于为什么会这样,我也不清楚
0.2.1 卸载输入法
# 卸载搜狗输入法
sudo apt -get purge sogoupinyin

# 卸载百度输入法
sudo dpkg --purge remove fcitx-baidupinyin:amd64
卸载deb包
sudo dpkg -r package_name
0.3 更改屏幕关闭时间
右上角选择 电源管理器
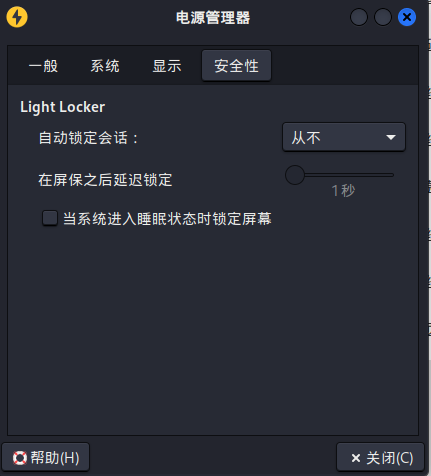
自动锁定会话选择 从不
0.4 安装vscode
# 使用官方APT存储库在Kali 上安装Visual Studio代码。在添加存储库之前,更新系统并安装下面的包。
sudo apt update
sudo apt install curl gpg software-properties-common apt-transport-https

# 导入Microsoft GPG密钥到您的Kali Linux:
curl -sSL https://packages.microsoft.com/keys/microsoft.asc | sudo apt-key add -

# 然后将APT存储库的VS Code添加到Kali Linux:
echo "deb [arch=amd64] https://packages.microsoft.com/repos/vscode stable main" | sudo tee /etc/apt/sources.list.d/vscode.list

# 安装vscode
sudo apt update
sudo apt install code
在当前文件夹打开vscode
code .
0.5安装截屏工具
sudo apt install deepin-screen-recorder
推荐
sudo apt-get install flameshot
启动命令
sudo apt-get install flameshot
0.6 linux剪贴板管理工具
这里是官网,点击访问
安装步骤
sudo add-apt-repository ppa:hluk/copyq
sudo apt update
sudo apt install copyq
使用的话直接输入copyq
开机启动
cd ~/.config/autostart
sudo vim myscript.desktop
[Desktop Entry]
Type=Application
Name=MyScript
GenericName=start copyq and exchange keyboard
Comment=start copyq and exchange keyboard
TryExec=copyq
Exec=copyq
Terminal=false
Hidden=false
1.显卡驱动安装
1.0 拓展
在进入启动项选择界面按E进入编辑模式
倒数第三行的quiet splash修改为quiet nouveau.modset=0 splash
# 开机默认进图形化界面
systemctl set-default graphical.target
# 开机默认进命令行界面
systemctl set-default multi-user.target
1.1准备
sudo apt -y full-upgrade -y

[ -f /var/run/reboot-required ] && sudo reboot -f
确定安装的GPU,并检查其使用的内核模块:
lspci | grep -i vga

安装nvidia-detect来检测显卡
sudo apt install -y nvidia-detect

nvidia-detect

lspci -s 01:00.0 -v

安装cuda
sudo apt install -y nvidia-driver nvidia-cuda-toolkit
期间会弹出对话框

点击ok就行
强制重启
sudo reboot -f
检测是否安装成功
nvidia-smi

2.java安装
卸载自带openjdk
sudo apt-get remove openjdk*

sudo apt-get remove openjdk-11-jre
sudo apt-get remove openjdk-11-jre-headless
下载地址← 点击下载
下载jdk-8u341-linux-x64.tar.gz
2.1准备
cp jdk-8u341-linux-x64.tar.gz /usr/local/java

cd /usr/local
tar -zxvf jdk-8u341-linux-x64.tar.gz
sudo mv jdk-8u341-linux-x64 jdk1.8
2.2环境变量配置
编辑/etc/profile
# set java env
export JAVA_HOME=/usr/local/java/jdk1.8
export PATH=$PATH:$JAVA_HOME/bin
至于classpath就不用配置了,那是java1.5之前的
注意这里path前面有$, 是markdown的问题,导致没有显示

2.3 通知系统java的位置
sudo update-alternatives --install "/usr/bin/java" "java" "/usr/local/java/jdk1.8/bin/java" 1
sudo update-alternatives --install "/usr/bin/javac" "javac" "/usr/local/java/jdk1.8/bin/javac" 1
sudo update-alternatives --install "/usr/bin/javaws" "javaws" "/usr/local/java/jdk1.8/bin/javaws" 1
sudo update-alternatives --install "/usr/bin/javaws" "javaws" "/usr/local/java/jdk1.8/bin/javaws" 1
2.4设置默认JDK
sudo update-alternatives --set java /usr/local/java/jdk1.8/bin/java
sudo update-alternatives --set javac /usr/local/java/jdk1.8/bin/javac
sudo update-alternatives --set javaws /usr/local/java/jdk1.8/bin/javaws
2.5更新profile
source /etc/profile
2.6zshrc配置
# set java env
export JAVA_HOME=/usr/local/java/jdk1.8
export PATH=$PATH:$JAVA_HOME/bin
注意这里path前面有$, 是markdown的问题,导致没有显示

2.7更新zshrc
source /etc/zsh/zshrc
3.go安装
3.1下载go
cp go1.19.linux.amd64.tar.gz /usr/local/

cd /usr/local
tar -zxvf go1.19.linux.amd64.tar.gz
sudo mv go1.19.linux.amd64 go
3.2设置profile
GOPATH不用设置
GOPATH 是Golang 1.5版本之前一个重要的环境变量配置,是存放 Golang项目代码的文件路径。
sudo vim /etc/profile
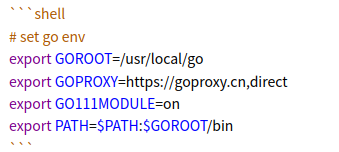
# set go env
export GOROOT=/usr/local/go
export GOPROXY=https://goproxy.cn,direct
export GO111MODULE=on
export PATH=$PATH:$GOROOT/bin
这里代码块显示有问题,请看截图
3.3 设置zshrc
sudo vim /etc/zsh/zshrc
# set go env
export GOROOT=/usr/local/go
export GOPROXY=https://goproxy.cn,direct
export GO111MODULE=on
export PATH=$PATH:$GOROOT/bin
这里代码块显示有问题,请看截图

3.4 更新profile
source /etc/profile

source /etc/zsh/zshrc
3.5验证
当换一个终端,go version有输出的时候就成功了
3.6小问题

之前在source /etc/profile的时候是没有问题的,在添加完go的环境之后就这样了
如果有大佬知道的话,还请多多指教
4.clash安装
github搜索clash for windows
github clash 下载
将.tar.gz包下载下来,后解压,将其放到/usr/local/software
并重命名为clash
cd到clash下面的cfw就是可执行文件
如果
./cfw
# 报错 zsh解析错误,二进制格式错误,就换一个版本的clash
创建快捷启动方式
sudo vim ~/.zshrc
在文件最后添加
alias clash="/usr/local/software/clash/cfw"
然后source ~/.zshrc更新一下
以后再直接
clash
就可以启动程序了
5.maven安装
衍生知识
-Xms:初始堆大小,堆内存初始大小,默认为物理内存大小的1/64
-Xmx:最大堆大小, 默认为物理内存的1/4
-Xmx并不是越大越好,堆越大,限制并发量,

对于高并发,创建对象不多的项目,可以降低Xmx的配置, 结合Xms 设定堆范围 -Xms256m -Xmx512
对于低并发,创建对象多的项目,(数据处理型的) 可以适当提高,Xmx
(因为对象和数组是存放到Heap内的,栈帧中其实只存了对象地址,所以不存在爆的情况)
点击这里进行扩展阅读
安装之前版本可以从这里进入

点这里下载
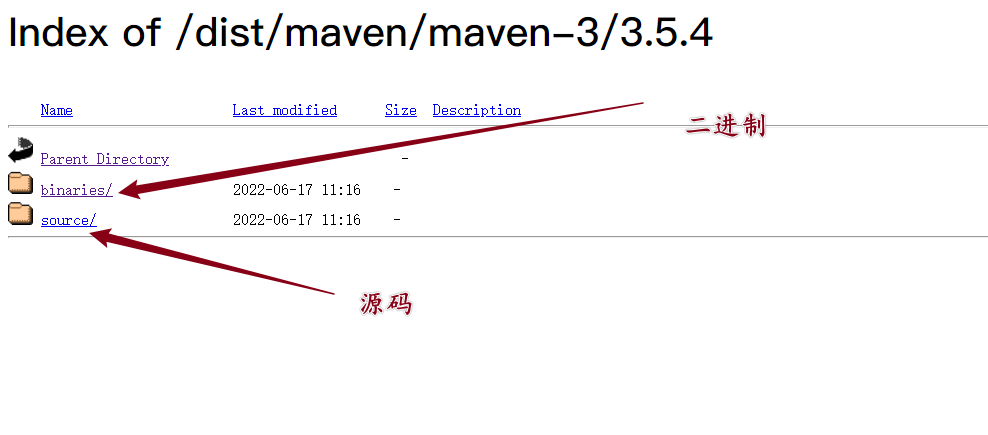
下载apache-maven-3.5.4-bin.tar.gz
sudo cp apache-maven-3.5.4-bin.tar.gz /usr/local

tar -xzvf apache-maven-3.5.4-bin.tar.gz

sudo mv apache-maven-3.5.4-bin maven
4.2添加环境变量
sudo vim /etc/profile
export M2_HOME=/usr/local/maven
export M2=$M2_HOME/bin
export MAVEN_OPTS="-Xms256m -Xmx512m"
export PATH=$PATH:$M2
看下面截图代码,markdown显示有问题

source /etc/profile
4.3添加zshrc
sudo vim /etc/zsh/zshrc
export M2_HOME=/usr/local/maven
export M2=$M2_HOME/bin
export MAVEN_OPTS="-Xms256m -Xmx512m"
export PATH=$PATH:$M2
看下面截图代码,markdown显示有问题

source /etc/zsh/zshrc
4.4通知系统
update-alternatives --install /usr/bin/mvn mvn /usr/local/maven/bin/mvn 1
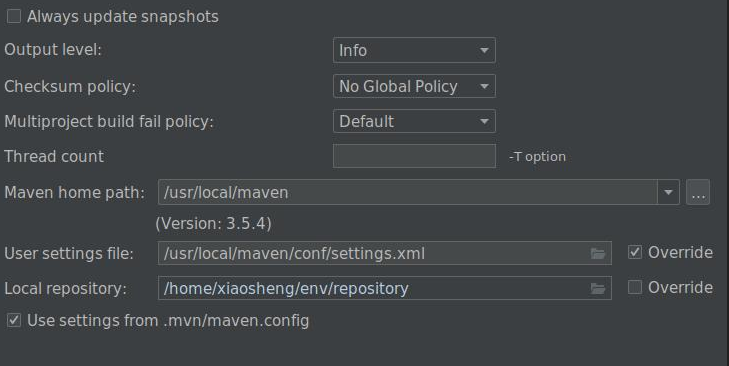
4.5maven settings.xml
cd home
mkdir xiaosheng
mkdir env
cd env
mkdir repository
编辑settings.xml
<localRepository>/home/xiaosheng/env/repository</localRepository>
在mirrors标签下添加阿里云镜像
<mirror>
    <id>aliyunmaven</id>
    <mirrorOf>*</mirrorOf>
    <name>阿里云公共仓库</name>
    <url>https://maven.aliyun.com/repository/public</url>
</mirror>
在idea中配置
5安装idea
这个没什么可讲的吧,解压,然后放到usr/local/software
5.1预备
cd idea
cd bin
./idea.sh
5.2创建快捷启动方式
sudo vim ~/.zshrc
在文件最后添加
alias clash="/usr/local/software/idea/bin/idea.sh"
然后source ~/.zshrc更新一下
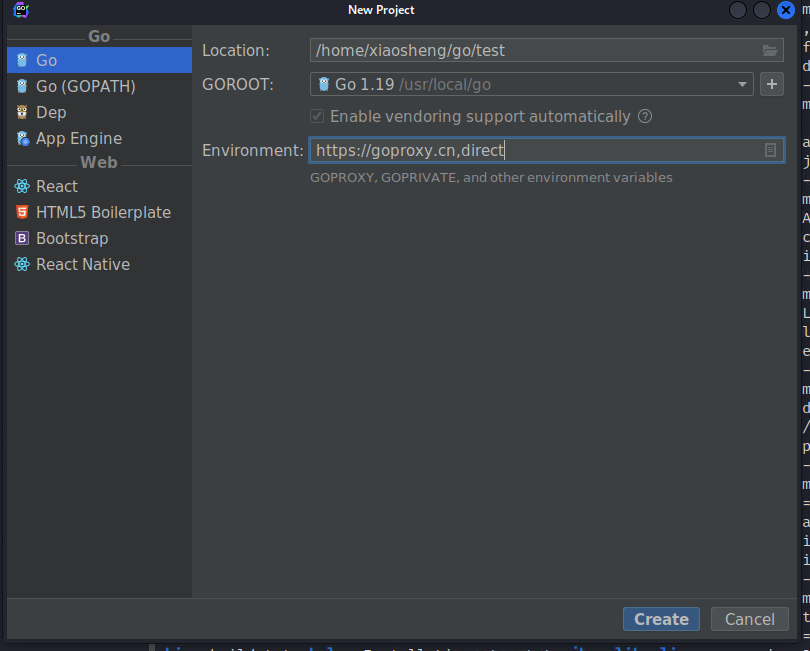
安装goland
其中有一点需要注意
https://goproxy.cn,direct
安装docker
sudo apt update

sudo apt install -y docker.io

systemctl enable docker --now

sudo apt install docker-compose
点击这个网址注册一下加速地址
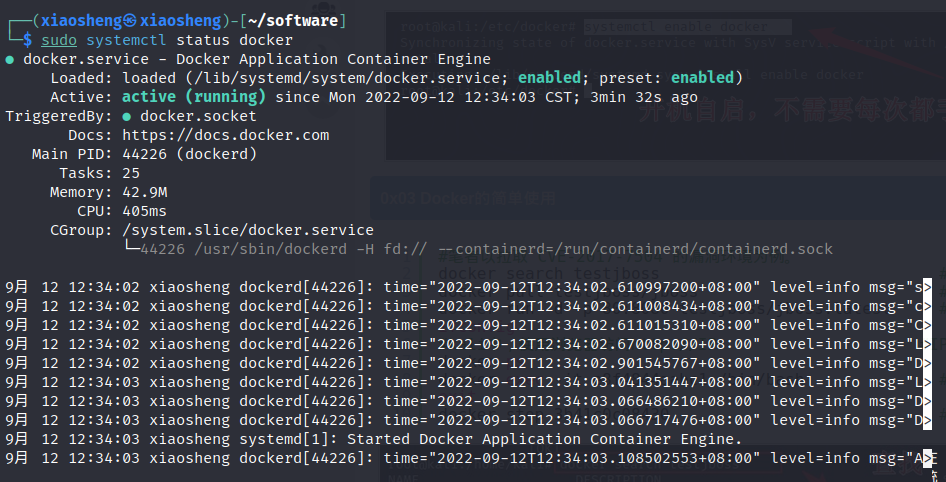
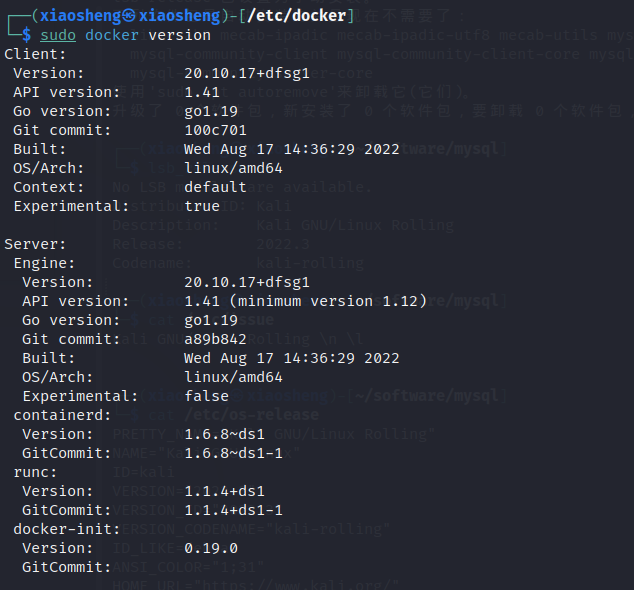
然后输入,查看docker状态,查看docker版本
(不加sudo没权限查看更多)
sudo systemctl status docker
sudo docker version
然后设置加速地址
daemon.json文件可能不存在
sudo vim /etc/docker/daemon.json
在文件中输入
{
  "registry-mirrors": ["https://d5p0xuix.mirror.aliyuncs.com"]
}
然后,重新加载,重启docker
sudo systemctl daemon-reload
sudo systemctl restart docker

#系统命令
systemctl start docker              #启动docker
systemctl stop docker               #停止docker
systemctl restart docker            #重启docker
systemctl enable docker             #设置docker开机自启
#基本命令
docker version                      #查看docker版本
docker info                         #查看docker详细信息
docker --help                       #查看docker命令
#镜像命令
docker images                       #查看docker镜像列表
docker images -a                    #列出本地所有镜像
docker images --digests             #显示镜像的摘要信息
docker search redis                 #从Docker Hub上查找redis镜像
docker pull redis                   #从Docker Hub上下载redis镜像
docker rmi 373f0984b070             #删除IMAGE ID 为373f0984b070的镜像
#运行命令
#-p 6379:6379   端口映射:前表示主机部分,后表示容器部分
#-d 在后台运行容器(不进入终端)并打印容器ID/容器名
#--name myredis表示自定义容器名为myredis
docker run -d -p 6379:6379 --name myredis redis:latest      #根据镜像创建并运行容器
#容器命令
docker container ls 或 docker ps             #查看正在运行的容器
docker container ls -a 或 docker ps -a           #列出所有容器
docker container start 容器ID 或 容器名称      #启动容器
docker start 容器ID 或 容器名称                    #启动容器
docker container stop 容器ID 或 容器名称           #停止容器
docker stop 容器ID 或 容器名称                 #停止容器
docker container rm 容器ID 或 容器名称         #删除容器
docker rm 容器ID 或 容器名称                       #删除容器
docker container logs -f 容器ID 或 容器名称        #查看容器日志
docker exec -it name /bin/bash                  #进入name(容器名/id)中开启交互式的终端,exit退出
docker help中文
Usage:
docker [OPTIONS] COMMAND [arg...]
       docker daemon [ --help | ... ]
       docker [ --help | -v | --version ]
A
self-sufficient runtime for containers.
Options:
  --config=~/.docker              Location of client config files  #客户端配置文件的位置
  -D, --debug=false               Enable debug mode  #启用Debug调试模式
  -H, --host=[]                   Daemon socket(s) to connect to  #守护进程的套接字(Socket)连接
  -h, --help=false                Print usage  #打印使用
  -l, --log-level=info            Set the logging level  #设置日志级别
  --tls=false                     Use TLS; implied by--tlsverify  #
  --tlscacert=~/.docker/ca.pem    Trust certs signed only by this CA  #信任证书签名CA
  --tlscert=~/.docker/cert.pem    Path to TLS certificate file  #TLS证书文件路径
  --tlskey=~/.docker/key.pem      Path to TLS key file  #TLS密钥文件路径
  --tlsverify=false               Use TLS and verify the remote  #使用TLS验证远程
  -v, --version=false             Print version information and quit  #打印版本信息并退出
Commands:
    attach    Attach to a running container  #当前shell下attach连接指定运行镜像
    build     Build an image from a Dockerfile  #通过Dockerfile定制镜像
    commit    Create a new image from a container's changes  #提交当前容器为新的镜像
    cp        Copy files/folders from a container to a HOSTDIR or to STDOUT  #从容器中拷贝指定文件或者目录到宿主机中
    create    Create a new container  #创建一个新的容器,同run 但不启动容器
    diff      Inspect changes on a container's filesystem  #查看docker容器变化
    events    Get real time events from the server#从docker服务获取容器实时事件
    exec      Run a command in a running container#在已存在的容器上运行命令
    export    Export a container's filesystem as a tar archive  #导出容器的内容流作为一个tar归档文件(对应import)
    history   Show the history of an image  #展示一个镜像形成历史
    images    List images  #列出系统当前镜像
    import    Import the contents from a tarball to create a filesystem image  #从tar包中的内容创建一个新的文件系统映像(对应export)
    info      Display system-wide information  #显示系统相关信息
    inspect   Return low-level information on a container or image  #查看容器详细信息
    kill      Kill a running container  #kill指定docker容器
    load      Load an image from a tar archive or STDIN  #从一个tar包中加载一个镜像(对应save)
    login     Register or log in to a Docker registry#注册或者登陆一个docker源服务器
    logout    Log out from a Docker registry  #从当前Docker registry退出
    logs      Fetch the logs of a container  #输出当前容器日志信息
    pause     Pause all processes within a container#暂停容器
    port      List port mappings or a specific mapping for the CONTAINER  #查看映射端口对应的容器内部源端口
    ps        List containers  #列出容器列表
    pull      Pull an image or a repository from a registry  #从docker镜像源服务器拉取指定镜像或者库镜像
    push      Push an image or a repository to a registry  #推送指定镜像或者库镜像至docker源服务器
    rename    Rename a container  #重命名容器
    restart   Restart a running container  #重启运行的容器
    rm        Remove one or more containers  #移除一个或者多个容器
    rmi       Remove one or more images  #移除一个或多个镜像(无容器使用该镜像才可以删除,否则需要删除相关容器才可以继续或者-f强制删除)
    run       Run a command in a new container  #创建一个新的容器并运行一个命令
    save      Save an image(s) to a tar archive#保存一个镜像为一个tar包(对应load)
    search    Search the Docker Hub for images  #在docker
hub中搜索镜像
    start     Start one or more stopped containers#启动容器
    stats     Display a live stream of container(s) resource usage statistics  #统计容器使用资源
    stop      Stop a running container  #停止容器
    tag       Tag an image into a repository  #给源中镜像打标签
    top       Display the running processes of a container #查看容器中运行的进程信息
    unpause   Unpause all processes within a container  #取消暂停容器
    version   Show the Docker version information#查看容器版本号
    wait      Block until a container stops, then print its exit code  #截取容器停止时的退出状态值
参考文献
1. 简书Kali-JDK1-8安装
2. linux创建命令和图标快捷启动 方式
3. github clash 下载
4. kail 2020.4 环境变量配置问题
5. Installing Golang on Kali Linux
6. How to install Golang (latest version) on Kali Linux
7. HOW TO INSTALL GOLANG IN KALI LINUX
8. install go in linux
9. csdnkali下安装go环境
10. Install NVIDIA GPU Drivers
11. config maven on kali linux
12. linux下键位 重新映射


13 条评论
bingoplus philippines bingo app online live · 2023-05-08 12:43
I love this site
nba · 2023-05-08 18:47
It’s a fantastic website
go development · 2023-05-12 06:19
naturally like your web site however you need to test the spelling
on several of your posts. Several of them are rife with
spelling issues and I find it very troublesome to inform the truth
nevertheless I’ll certainly come back again.
aspor.ua · 2023-05-12 19:42
These are truly fantastic ideas in about blogging. You have touched some good things here.
Any way keep up wrinting.
enamtechsolutions.com · 2023-05-14 21:45
Hello there! I just would like to offer you a big thumbs up for
the excellent information you’ve got right here on this post.
I am coming back to your web site for more soon.
https://aspor.ua/ru/akkumulyatory · 2023-06-12 07:58
Thanks to my father who informed me about this blog, this website is really
remarkable.
xiaosheng · 2023-06-12 16:23
are you serious? hahaha
ufaland · 2024-04-08 08:34
I just like the helpful information you provide in your articles
ดูบอลสด · 2024-04-25 04:17
I just like the helpful information you provide in your articles
ดูบาสสด · 2024-05-02 05:21
I am truly thankful to the owner of this web site who has shared this fantastic piece of writing at at this place.
ufa191 · 2024-05-04 02:37
Awesome! Its genuinely remarkable post, I have got much clear idea regarding from this post
betflix · 2024-05-09 13:10
I’m often to blogging and i really appreciate your content. The article has actually peaks my interest. I’m going to bookmark your web site and maintain checking for brand spanking new information.
โปรแกรมวัวชนวันนี้ · 2024-05-13 14:07
naturally like your web site however you need to take a look at the spelling on several of your posts. A number of them are rife with spelling problems and I find it very bothersome to tell the truth on the other hand I will surely come again again.
评论已关闭。